Formatting is always an essential element for any Word document. A well-formatted document helps you make a good impression on others and makes it easier for readers to follow and understand the content. So, what is text formatting in Word and how to do it? Let’s find out.
Nội dung
I. WHAT IS TEXT FORMATTING IN WORD?
Text formatting in Word refers to operations that help you adjust and refine the appearance and content of your document, making it more polished and professional. There are various operations, but the most common and fundamental ones include:
- Aligning page margins
- Adjusting fonts
- Setting line spacing and paragraph spacing
- Aligning document margins
- …
These are the most basic steps to format a document properly. Additionally, depending on individual needs, there may be other formatting operations. Below, we will guide you through the basic operations mentioned above.
II. TEXT FORMATTING OPERATIONS
1: Selecting Paper Size in Word
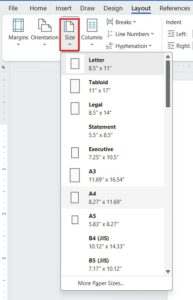 Purpose: Helps you select the correct paper size, making printing more convenient.
How to do it:
- On the toolbar, select the Page Layout tab.
- Find the Page Setup section and click Size.
- In the dropdown menu, select the paper size you want.
- Generally, the standard paper size used for documents is A4 (210mm × 297mm).
2: Changing the Font in a Document
Purpose: Ensures that the document content is clear and easy to read. Standardizing fonts makes it easier for readers to follow the text.
How to do it:
Step 1: Highlight the text you want to modify.
Step 2: Open the Font dialog box in one of two ways:
On the toolbar, go to the Home tab and click on the small arrow in the bottom-right corner of the Font section.
Or use the shortcut Ctrl + D to open the Font dialog box.

Normally, the commonly used font is Times New Roman, and the font size is 12 (or 13) for standard documents. Titles and headings may have larger font sizes and be formatted in bold or italic.
To set your selected font, font style, and size as the default for all future Word documents:
- In the Font dialog box, click Set As Default.
- Choose All documents based on the Normal template to apply this setting to all new documents.
- Click OK to confirm.
III: Adjusting Line and Paragraph Spacing
Purpose: Helps create proper spacing between lines and paragraphs, making the text easier to read and preventing overlapping or cramped content.
How to do it:
Step 1: Highlight the text that needs adjustment.
Step 2: Open the Paragraph dialog box using one of the following methods:
- In the Home tab, locate the Paragraph section and click the small arrow in the bottom-right corner.
- Right-click on the highlighted text and select Paragraph.
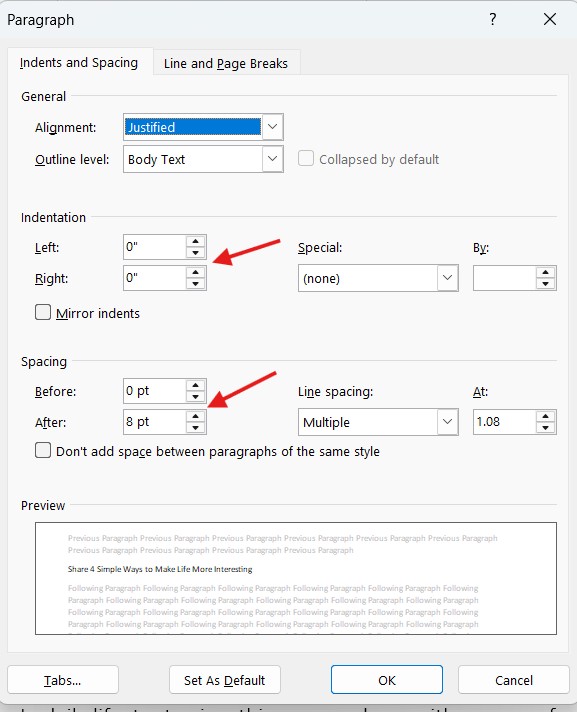
(Adjusting line and paragraph spacing )
When the Paragraph dialog box appears, go to the Indents and Spacing tab and adjust the spacing using:
- Before: Sets the spacing before the paragraph.
- After: Sets the spacing after the paragraph.
For Line Spacing, you can choose from the following options:
- Single: Normal line spacing.
- 1.5 lines: One and a half times the normal line spacing.
- Double: Twice the normal line spacing.
- At least: Minimum spacing required.
- Exactly: Fixed spacing.
- Multiple: Spacing set to a specific multiple.
After setting the desired spacing, click OK to close the Paragraph dialog box and apply the changes.
IV: Setting Margins in Word
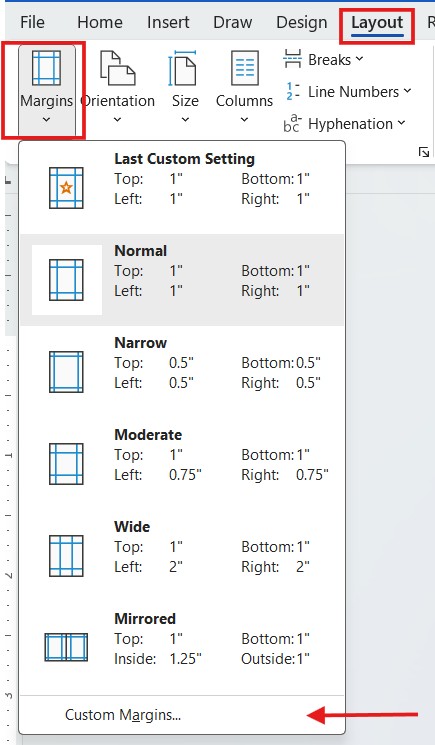
(Setting margins in Word)
Purpose: Helps align text neatly within the document. Proper margins prevent text from being cut off during printing and leave space for binding.
How to do it:
You can set margins according to standard formatting rules for official documents, typically as follows:
- Top margin: 20mm – 25mm
- Bottom margin: 20mm – 25mm
- Left margin: 30mm – 35mm
- Right margin: 15mm – 20mm
Alternatively, you can customize the margin sizes as needed:
In the Page Layout tab, go to Margins and scroll down to select Custom Margins.
In the Page Setup dialog box, enter your preferred margin sizes in the following fields:
- Top (sets the top margin)
- Bottom (sets the bottom margin)
- Left (sets the left margin)
- Right (sets the right margin)
Click OK to apply the settings.
V: Using Align in Word to Adjust Text Positioning
Align helps position titles, paragraphs, headings, etc., exactly where you want them without having to repeatedly press the Space key.
How to use it:
Highlight the text you want to format.
Go to the Home tab on the toolbar. In the Paragraph section, you will find the following alignment options:
- Align Text Left – Aligns text to the left margin (Shortcut: Ctrl + L).
- Center – Centers the text (Shortcut: Ctrl + E).
- Align Text Right – Aligns text to the right margin (Shortcut: Ctrl + R).
- Justify – Aligns text evenly on both sides (Shortcut: Ctrl + J).
Select the alignment option that best suits your needs, and the text will be formatted accordingly.
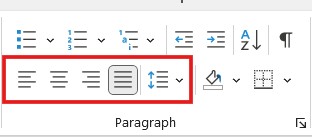
(Using Align in Word to adjust text positioning)
CONCLUSION
In this tutorial, we covered how to format text in Word, including setting margins, adjusting line and paragraph spacing, modifying fonts, and aligning text. We also provided step-by-step instructions to help you apply these formatting techniques with confidence.
We hope this article helps you create well-structured, professional-looking documents.
Don’t forget to visit our blog regularly for more helpful tips and tricks! Thanks for reading, and good luck with your document formatting.