In this article, we will explore how to automatically highlight the rows and columns of the selected cell in Excel. There are two main methods: using VBA and using Conditional Formatting. Each method has its own advantages and disadvantages.
Nội dung
I. Using VBA to Highlight Rows and Columns
VBA is a powerful approach that allows you to automatically change the background color of the row and column whenever you select a new cell.
1. Writing the VBA Code
First, we will use the SelectionChange event of the Worksheet object to automatically change the background color of the row and column whenever the selected cell changes.
Private Sub Worksheet_SelectionChange(ByVal Target As Range)
If Target.Cells.Count > 1 Then Exit Sub ' Exit if multiple cells are selected
Application.ScreenUpdating = False ' Improve performance by disabling screen updating
' Clear background color of all cells
Cells.Interior.ColorIndex = 0
With Target
' Highlight the row and column of the selected cell
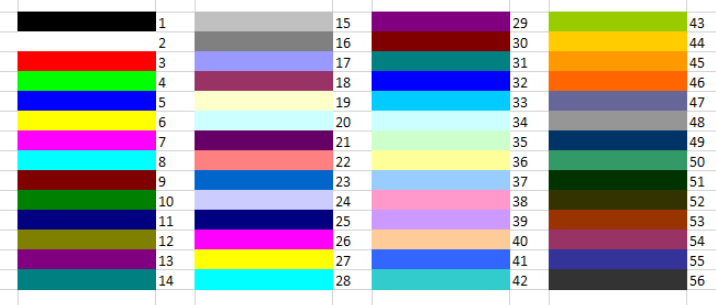
.EntireRow.Interior.ColorIndex = 28 ' Row color
.EntireColumn.Interior.ColorIndex = 36 ' Column color
End With
Application.ScreenUpdating = True ' Re-enable screen updating
End Sub
2. Explanation of the Code
If Target.Cells.Count > 1 Then Exit Sub: Ensures the code runs only when a single cell is selected.Application.ScreenUpdating = False: Turns off screen updates to improve performance.Cells.Interior.ColorIndex = 0: Clears the background color of all cells before updating the new selection..EntireRow.Interior.ColorIndex = 28: Highlights the entire row of the selected cell with color index 28..EntireColumn.Interior.ColorIndex = 36: Highlights the entire column of the selected cell with color index 36.Application.ScreenUpdating = True: Turns screen updates back on to reflect changes.
3. Customizing the Code
- To change colors, replace ColorIndex values with other color codes.
- To highlight only the row, remove
.EntireColumn.Interior.ColorIndex = 36. - To highlight only the column, remove
.EntireRow.Interior.ColorIndex = 28.
4. How to Insert VBA into Excel
- Press Alt + F11 to open the VBA Editor.
- Press Ctrl + R to open the Project Explorer.
- Select the worksheet where you want to insert the code and double-click it.
- Paste the VBA code into the Code window.
- Save the file as .xlsm (to support macros).
5. Important Notes
| VBA Drawbacks | Solutions |
|---|---|
| Clears the background color of all cells in the worksheet. | Use Conditional Formatting if you have custom-colored cells. |
| Cannot undo changes with Ctrl + Z. | Create a backup before running the VBA code. |
| May slow down performance with large datasets. | Optimize the code if needed. |
II. Using Conditional Formatting to Highlight Rows and Columns
If you don’t want to use VBA, you can use Conditional Formatting to automatically highlight rows and columns based on the selected cell.
1. Steps to Set Up Conditional Formatting
Step 1: Select the data range where you want to apply the formatting.
Step 2: Go to Home → Conditional Formatting → New Rule.
Step 3: Select “Use a formula to determine which cells to format.”
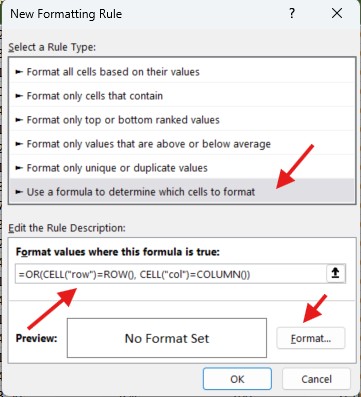
In the Formula field, enter one of the following formulas:
To highlight the row:
=CELL("row")=ROW()
To highlight the column:
=CELL("col")=COLUMN()
To highlight both the row and column:
=OR(CELL("row")=ROW(), CELL("col")=COLUMN())
Step 4: Click Format, choose a color in the Fill tab, and press OK.
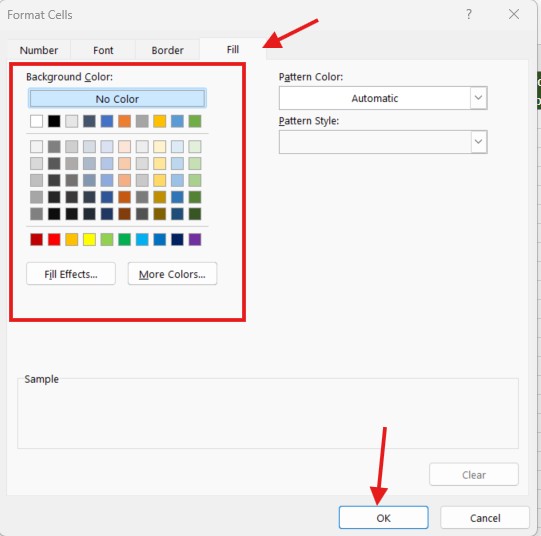
Step 5: Click OK again to apply the rule.
2. Drawbacks and Solutions
| Drawback | Solution |
|---|---|
| Conditional Formatting does not update automatically when selecting a new cell. | Press F9 to refresh the worksheet. |
| To automatically refresh, use the following VBA code: |
Private Sub Worksheet_SelectionChange(ByVal Target As Range)
    Target.Calculate
End Sub
III. VBA vs. Conditional Formatting: Which One to Choose?
| Criteria | VBA | Conditional Formatting |
|---|---|---|
| Automatic Updates | ✅ Yes | ❌ No (Requires F9) |
| Affects Background Color | ❌ Clears all colors | ✅ Keeps existing colors |
| Processing Speed | ❌ Slower for large datasets | ✅ Faster |
| Complexity | ❌ Requires VBA coding | ✅ No coding needed |
| Undo with Ctrl + Z | ❌ No | ✅ Yes |
| Color Customization | ✅ Flexible | ❌ Limited |
IV. When Should You Highlight the Row and Column of the Selected Cell in Excel?
Highlighting the row and column of the selected cell in Excel provides several benefits:
– Working with Large Data: When working with large spreadsheets, it’s easy to lose track of your current position. Highlighting helps you quickly locate the selected cell and avoid entering data in the wrong place.
– Faster Data Processing: If you frequently enter or review data, highlighting rows/columns allows you to identify relevant information faster without searching manually.
– Better Report Presentation: In important reports and data tables, highlighting can make your presentation clearer and easier to follow.
– Easier Error Checking: When verifying data, highlighting helps you compare numbers between rows and columns accurately, reducing mistakes.
– Improved Aesthetics and Professionalism: A spreadsheet with automatic row/column highlighting looks more professional and user-friendly, especially in team collaborations or presentations to managers.
V. Conclusion
Highlighting rows and columns of the selected cell in Excel not only helps you work faster and more accurately but also enhances the aesthetics and professionalism of your spreadsheet. If you frequently work with large datasets, verify data, or want to present reports more clearly, this is a useful feature worth applying. Have you tried any of these methods? If you have a better tip, feel free to share!
See more: How to Automatically Resize Text to Fit Cells in Excel